What is an API?
API or application programming interface is a type of interface between the different parts or microservices of the application that communicate with each other. API is used in almost every IT-based application and has become an essential part of modern-day programming.
Origin of APIs
The barebones version of APIs started around 1950s. But they were seen as a form of communication between two or more computers. APIs then were largely command line based and was routinely written in the earlier programming languages such as FORTRAN, etc. APIs also had many applications in networking and system communication.
By 1974, the first ever paper defining an API was published - “The Relational and Network Approaches: Comparison of the Application Programming Interface”. Then by the 1980-2000s, the use of API skyrocketed with internet-based applications becoming popular, the need for API for Internet-based Remote Procedure Calls (RPC) Increased too.
Also with the growing popularity of cloud computing, many cloud providers decided to push a cloud-first approach, which majorly dealt with using many different APIs for automating tasks and retrieving data from the cloud.
Types of APIs
Understanding Different Types of APIs: A Complete Guide

Let's explore the different types of APIs and their use cases.
1. Based on Architecture and Communication Style
a) RESTful APIs - Representational State Transfer APIs
It uses a communication style based on the HTTP communication style, i.e. using request such as:
GET - GET is also known as the request command, it is used to request a certain part of data from the source data via a buffer application. The GET is usually followed by the parameters such as ?param1=”someparamhere”
POST - A POST request is when you want your API to receive data in a secure manner such that a malicious third party does not easily intercept it, then the POST command is used to send data over to the API server. It is mostly sent via an HTTPS channel, hence the data is sent securely avoiding possible man in the middle attacks as much as possible. Here is how a demo POST request works with the CURL command:
Post a simple name and phone guestbook.
curl -d "name=Rafael%20Sagula&phone=3320780" http://www.example.com/guest.cgi
PUT
A PUT Request in Restful API is a means to update the pre-existing data with new data, it is similar to the GET Method but instead of adding a new input, we just update the existing data with our new input data in the API.
DELETE
A Delete request in Restful API is meant to delete a certain section of data from the API storage. This method is especially convenient to remove older unused data or to remove data which has been requested to be deleted systematically. It is a particularly useful function of the Restful API format.
Here are some more facts about the Restful API Format
Data Format: Typically JSON or XML.
The medium of data format used in communication is generally JSON or XML.
Statelessness: No client context is stored on the server.
The API does not assume a default state or store cache of previous client interactions. It is started afresh.
Scalability: Highly scalable and widely used in web applications.
REST API, owing to its simple to implement nature is widely used in many web applications. Since it is simple to maintain and debug, it makes RESTful APIs easy to scale to a great number of users.
Examples: Twitter API, GitHub API, Google Maps API.
Best suited for: Web and mobile applications, microservices, and public APIs.
Below is a step-by-step tutorial on building a simple REST API using Python's Flask framework. This tutorial will guide you through setting up your environment, writing your API code, and testing your endpoints.
Step 1: Set Up Your Environment
Install Python:
Make sure you have Python 3.x installed. You can download it from python.org.
Create a Virtual Environment (Optional but Recommended):
Open your terminal or command prompt and run:
python -m venv venv
Activate the virtual environment:
On Windows:
venv\Scripts\activate
On macOS/Linux:
source venv/bin/activate
Install Flask:
With your virtual environment activated, install Flask using pip:
pip install Flask
Step 2: Create a Basic Flask Application
Create a new Python file named app.py and add the following code:
from flask import Flask, jsonify, request
app = Flask(__name__)
# Sample data: a list of book dictionaries
books = [
{'id': 1, 'title': 'The Great Gatsby', 'author': 'F. Scott Fitzgerald'},
{'id': 2, 'title': '1984', 'author': 'George Orwell'},
{'id': 3, 'title': 'To Kill a Mockingbird', 'author': 'Harper Lee'}
]
# GET endpoint to retrieve all books
@app.route('/api/books', methods=['GET'])
def get_books():
return jsonify({'books': books})
# GET endpoint to retrieve a single book by ID
@app.route('/api/books/<int:book_id>', methods=['GET'])
def get_book(book_id):
book = next((book for book in books if book['id'] == book_id), None)
if book is None:
return jsonify({'error': 'Book not found'}), 404
return jsonify({'book': book})
# POST endpoint to add a new book
@app.route('/api/books', methods=['POST'])
def create_book():
if not request.json or 'title' not in request.json or 'author' not in request.json:
return jsonify({'error': 'Bad request'}), 400
new_book = {
'id': books[-1]['id'] + 1 if books else 1,
'title': request.json['title'],
'author': request.json['author']
}
books.append(new_book)
return jsonify({'book': new_book}), 201
# PUT endpoint to update an existing book
@app.route('/api/books/<int:book_id>', methods=['PUT'])
def update_book(book_id):
book = next((book for book in books if book['id'] == book_id), None)
if book is None:
return jsonify({'error': 'Book not found'}), 404
data = request.json
book['title'] = data.get('title', book['title'])
book['author'] = data.get('author', book['author'])
return jsonify({'book': book})
# DELETE endpoint to remove a book
@app.route('/api/books/<int:book_id>', methods=['DELETE'])
def delete_book(book_id):
global books
book = next((book for book in books if book['id'] == book_id), None)
if book is None:
return jsonify({'error': 'Book not found'}), 404
books = [b for b in books if b['id'] != book_id]
return jsonify({'result': 'Book deleted'})
if __name__ == '__main__':
app.run(debug=True)
Step 3: Understand the Code
Imports:
The code imports the necessary Flask modules to handle HTTP requests and JSON responses.Data:
We use a simple list called books to store our sample data. In a production application, you would typically use a database.Endpoints:
GET /api/books: Returns a list of all books.
GET /api/books/<book_id>: Returns a specific book based on the provided ID.
POST /api/books: Accepts JSON data to add a new book to the list.
The request must include title and author in the JSON payload.
PUT /api/books/<book_id>: Updates an existing book.
Only the provided fields (title and/or author) are updated.
DELETE /api/books/<book_id>: Removes the specified book from the list.
Running the App:
The application runs on the default Flask development server with debugging enabled.
Step 4: Run Your Application
Run your Flask app by executing the following command in your terminal:
python app.py
If everything is set up correctly, you'll see output similar to:
* Running on http://127.0.0.1:5000/ (Press CTRL+C to quit)
* Debug mode: on
Step 5: Testing Your API
You can test your API endpoints using tools like Postman, cURL, or simply your web browser.
Example Using cURL:
GET all books:
curl http://127.0.0.1:5000/api/books
GET a single book (e.g., ID 1):
curl http://127.0.0.1:5000/api/books/1
POST a new book:
curl -X POST -H "Content-Type: application/json" \
-d '{"title": "Brave New World", "author": "Aldous Huxley"}' \
http://127.0.0.1:5000/api/books
PUT to update a book (e.g., ID 2):
curl -X PUT -H "Content-Type: application/json" \
-d '{"title": "Animal Farm", "author": "George Orwell"}' \
http://127.0.0.1:5000/api/books/2
DELETE a book (e.g., ID 3):
curl -X DELETE http://127.0.0.1:5000/api/books/3
c) GraphQL APIs
GraphQL is an open-source query and manipulation language used to develop APIs. GraphQL allows you to query for the data you want by defining the schema. The schema will enable you to determine the structure of the API.
GraphQL has its very own query language called SDL (schema definition language). You can use SDL to define the data you want to retrieve, as you can use SDL to structure your API from a data source (like MySQL). You can use GraphQL to query the data that you want without much server manipulation. This is an advantage of using GraphQL over REST.
In this post, we'll learn about an API using GraphQL. Let's see what a GraphQL schema looks like and how to query a GraphQL API.
We'll also be querying the SpaceX website to get an idea of how GraphQL queries work.
Querying the SpaceX GraphQL API Example
If you visit the SpaceX GraphQL API - https://studio.apollographql.com/public/SpaceX-pxxbxen/variant/current/home, you'll be taken to a GraphiQL explorer. The GraphiQL explorer allows you to explore the SpaceX API and run demo queries. The GraphiQL explorer looks something like this:
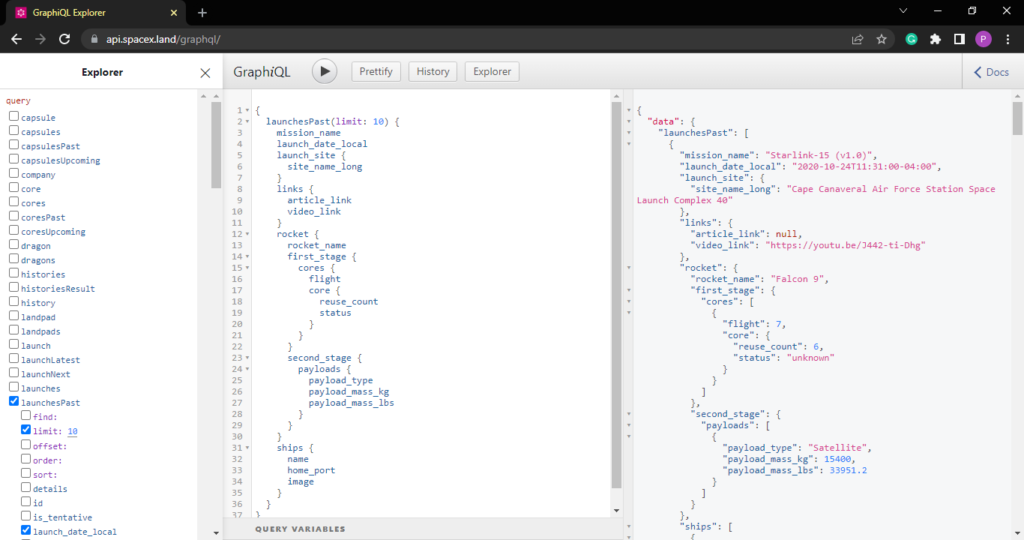
Now, we'll try to modify the query to get the mission data and rocket information. Then, we'll modify the query by changing it to the following:
{
launchesPast(limit: 10) {
mission_name
launch_date_local
launch_site {
site_name_long
}
rocket {
rocket_name
first_stage {
cores {
flight
core {
reuse_count
status
}
}
}
}
}
}
By running the query, we'll see that we only get mission data and rocket information. You can try different queries with different information to get practice with GraphQL APIs.
Next, we'll build a simple application using GraphQL APIs to better understand how GraphQL APIs work. We'll do this by building a quotes API that generates a random quote from a list of quotes, and the "/graphql" route that displays the complete list of quotes. We'll use GraphQL to query data from the back end.
Another GraphQL API example: Writing the Back End
In this section, we'll write the back end of the project, which consists of a GraphQL server hosted at "http://localhost:5000/graphql." We'll use the "express" and "express-graphql" libraries, as well as a publicly available quotes JSON file from here.
Importing Libraries
Here, we'll write the back end of our quote app using the express framework in JavaScript. We'll be using the libraries "express," "cors," and "express-graphql." The CORS (cross-origin resource-sharing) library is used to share resources among the same IP address, e.g., we use localhost for both the front end and back end but different protocols.
React is generally hosted on 3000, while we host our GraphQL server on 5000. To share resources between the two servers, we generally use CORS.
We'll start the code by importing the required libraries:
var express = require('express');
var { graphqlHTTP } = require('express-graphql');
var { buildSchema } = require('graphql');
Now, we'll construct the schema for our application. We'll do so by defining the schema using the schema definition language (SDL). But before that, we need to add the list of quotes to our code.
Adding Data
var Quotes = { #You can include this JSON file from here - #https://gist.github.com/nasrulhazim/54b659e43b1035215cd0ba1d4577ee80
}
This is the data part of the "quotes" object, which is a list of quotes and authors in an object format. We'll reference this list later in the project using GraphQL queries. The quotes data was taken from here.
Writing the Schema
Now, we'll define the schema for our application. We'll do this by using the buildSchema function:
var schema = buildSchema(`
type Quote {
author: String
quote: String
}
type Query {
quotes: [Quote]
}
`);
Here in the schema, we'll define the quote as having two elements—one is the author tag, and the other is the quote. We'll define this as the quote object. Then, in the root query, we'll set quotes as a list of the type quote. This will set quotes as an object of the type quote while requesting data from the API.
Next, we need to define the root of the GraphQL function, where the data is passed on to the GraphQL server. In our case, we'll pass the list of quotes to GraphQL.
var root = {
quotes: () => {
return Quotes.quotes;
},
};
Here, we pass only the list of quotes to the root and not the complete quotes object.
Writing the Back-End Logic
Now, let's add the back-end server logic to our code by initializing the "/graphql" route, and then we'll use the graphqlHTTP function to run the GraphQL server at the "/graphql" route. We pass the schema and the rootValue to graphqlHTTP and set GraphiQL—which is the interactive GraphQL data visualizer—to true:
var app = express(cors());
app.use('/graphql', graphqlHTTP({
schema: schema,
rootValue: root,
graphiql: true,
}));
app.listen(5000);
console.log('Running a GraphQL API server at http://localhost:5000/graphql');
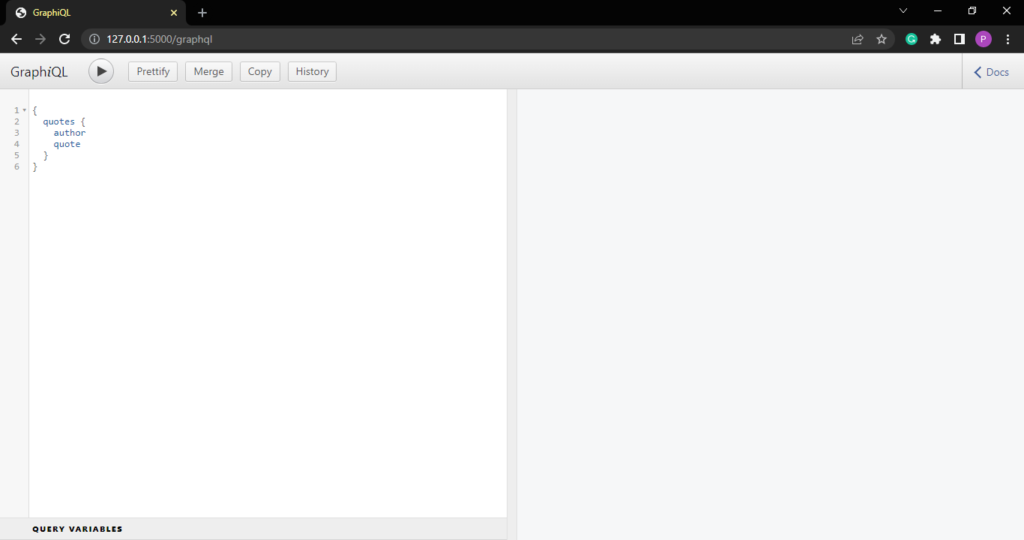
Testing
Now, combining all of this together, we'll run this code using node, i.e., node server.js. This will run your GraphQL server at the "/graphql" endpoint on your localhost. You should see something like this:
Once you click on run, you should see the data output shown on the right side of the screen:
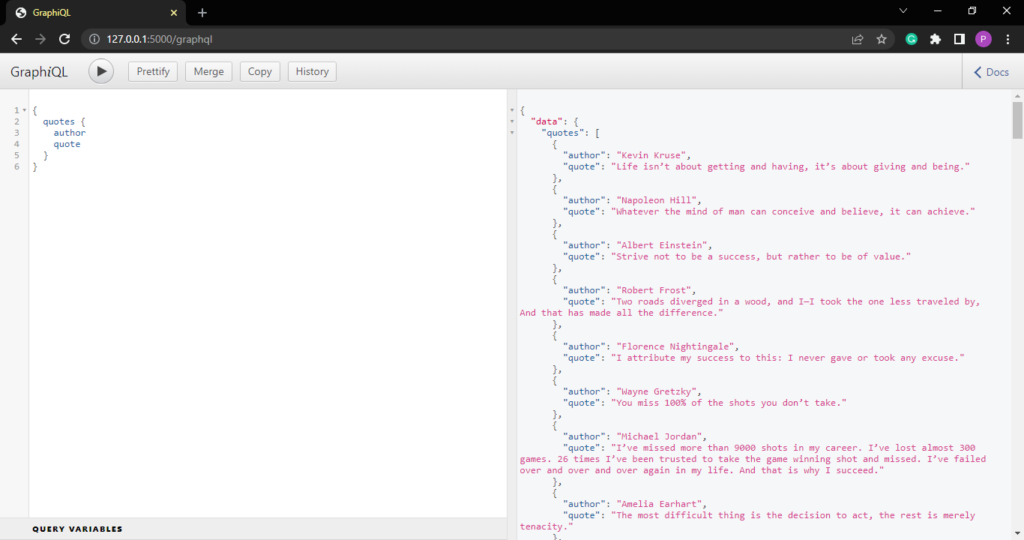
You can go through the output of the data to see the list of quotes and their authors. You can choose to omit the author data by removing the author in the query section:
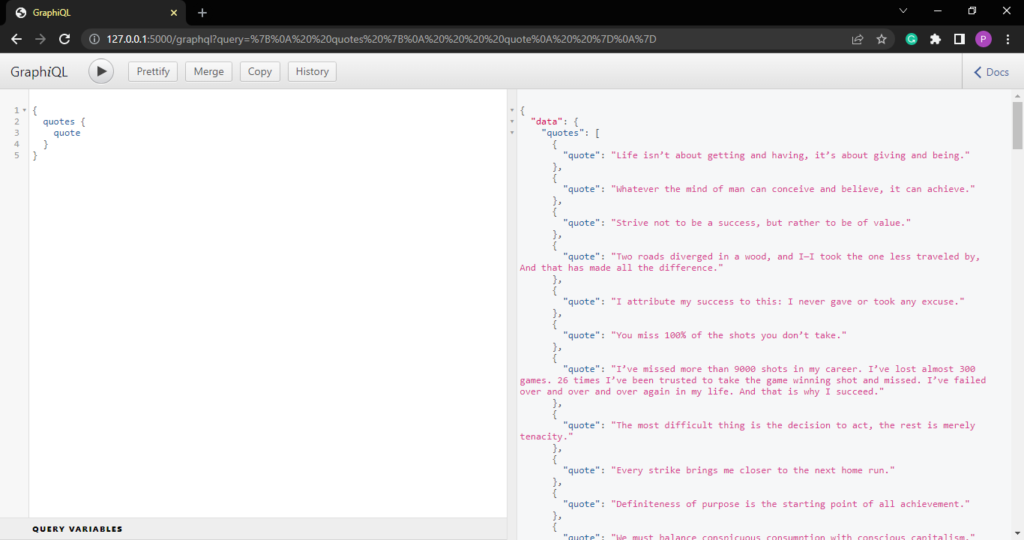
Now, you can view and query the data you require. This completes the back end of the application.
Best for: Applications with complex data requirements like social media platforms.
Conclusion
In this post, we've journeyed through the fascinating world of APIs—from their historical origins to their modern-day implementations. We began by exploring what APIs are and traced their evolution from simple command-line interfaces in the 1950s to indispensable components of today’s interconnected digital landscape. This historical perspective sets the stage for understanding why APIs are so crucial for both legacy systems and cutting-edge cloud applications.
We then delved into the various types of APIs, highlighting the strengths and use cases of both RESTful APIs and GraphQL. With RESTful APIs, we discussed how standard HTTP methods like GET, POST, PUT, and DELETE form the backbone of web communication, making them ideal for building scalable and maintainable web and mobile applications. In contrast, GraphQL was presented as a powerful alternative for scenarios that demand flexible, efficient, and precise data retrieval—especially in environments with complex data relationships.
The step-by-step tutorials provided for both RESTful and GraphQL APIs offered a practical, hands-on approach to API development. Through our Flask-based REST API example, you learned how to set up a simple backend service, implement CRUD operations, and test endpoints using tools like cURL. Similarly, the GraphQL tutorial demonstrated how to build a dynamic quotes API using Express and GraphQL, emphasizing the ease of querying and manipulating data with GraphQL’s schema definition language.
Whether you’re just starting your API development journey or looking to expand your technical repertoire, the concepts and examples discussed in this post serve as a solid foundation. APIs are not just about data exchange—they are about enabling communication and innovation in a rapidly evolving technological landscape.
As you move forward, consider this post a stepping stone toward mastering API development. Experiment with these techniques, explore additional features such as authentication and error handling, and stay curious about emerging trends. Happy coding, and here’s to building robust, efficient, and innovative APIs!
Comments
Post a Comment